# Creating your first xAPI Action Flow

Now that your setup is complete, you are about to create your first **Salesforce Flow** with integrated **xAPI Actions**. Following this process exactly as described below will give you a good high-level understanding of how the application functions.

{% hint style="success" %}
For this example we will use **Salesforce Chatter** as a convenient endpoint to demonstrate an xAPI triggered Action Flow.

**Our Aim is to send all inbound xAPI Verbs to a chatter stream.**
{% endhint %}

We will first create a Salesforce **Flow** that will go on to send a message to **Chatter** when the xAPI triggered event is fired.

### Creating the flow

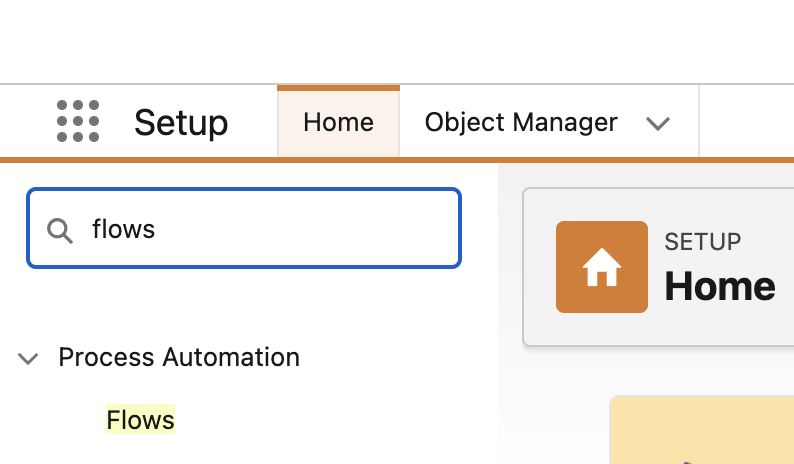
From the Salesforce **Setup** screen, use **Quick Find** to locate “**Flows**”:

<figure><img src="https://1749012385-files.gitbook.io/~/files/v0/b/gitbook-x-prod.appspot.com/o/spaces%2FcTyQ05dv9UTW8n6ypeAM%2Fuploads%2FbSUTJUDz3P2YgXmnu48Q%2FScreenshot%202024-08-29%20at%2012.51.05.png?alt=media&#x26;token=51407b61-9654-4468-8f3e-904816ad0210" alt="" width="375"><figcaption></figcaption></figure>

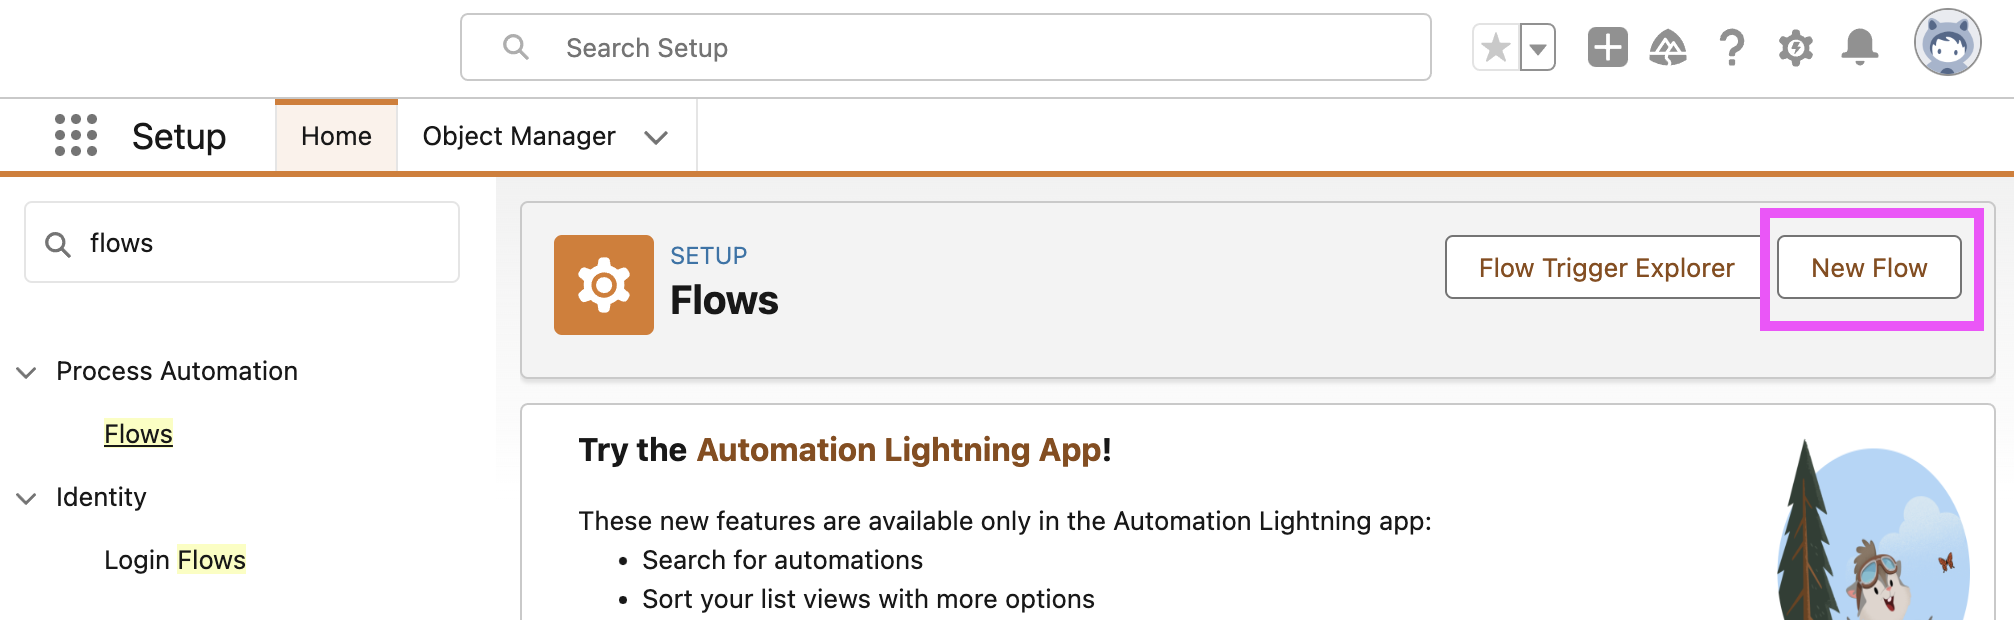
Open the **Flows** app and select to create a **New Flow:**

<figure><img src="https://1749012385-files.gitbook.io/~/files/v0/b/gitbook-x-prod.appspot.com/o/spaces%2FcTyQ05dv9UTW8n6ypeAM%2Fuploads%2F0SpHSjQGoZSIajVL0MGx%2FScreenshot%202024-08-29%20at%2012.51.24.png?alt=media&#x26;token=aa315492-43df-4747-b888-5f01c96ab79c" alt="" width="375"><figcaption></figcaption></figure>

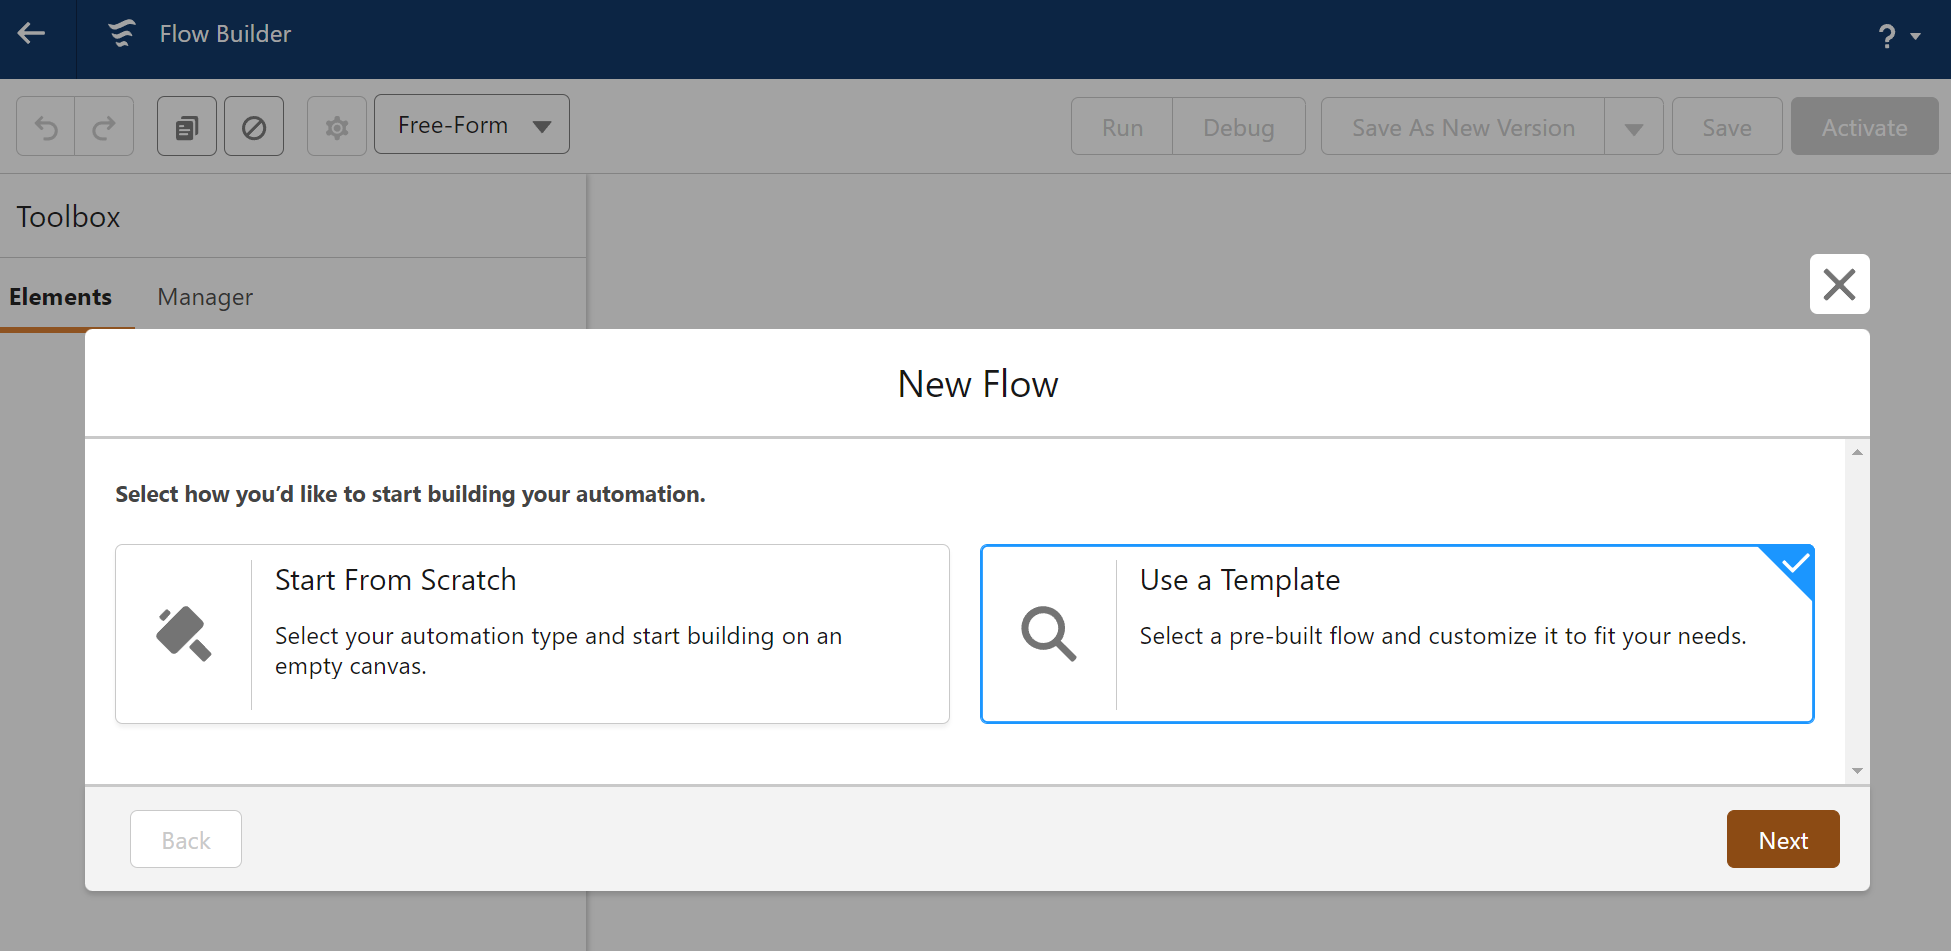
Select to "**Use a Template**", and select **Next:**

<figure><img src="https://1749012385-files.gitbook.io/~/files/v0/b/gitbook-x-prod.appspot.com/o/spaces%2FcTyQ05dv9UTW8n6ypeAM%2Fuploads%2F9dPnTT0W0r5hxEtg40Vy%2Fimage.png?alt=media&#x26;token=47a4d6b1-74f4-40ae-a875-0bfe7a3b44b9" alt="" width="563"><figcaption></figcaption></figure>

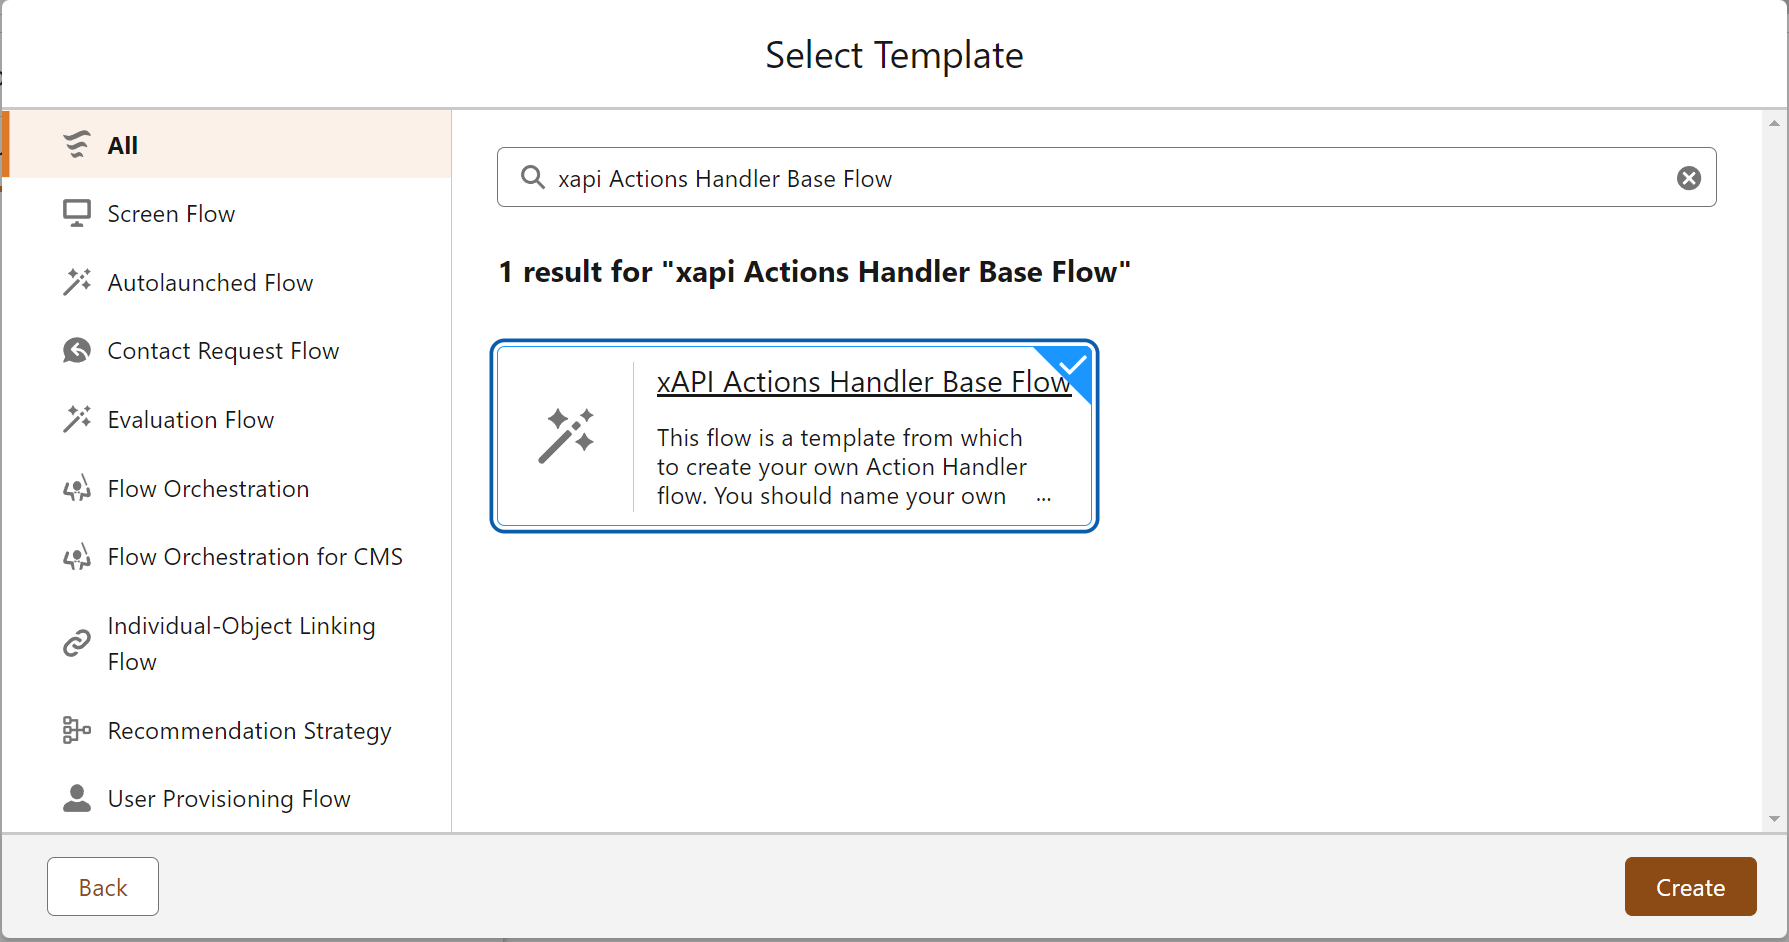
Select "**xAPI Actions Handler Base Flow**" and select **Create:**

<figure><img src="https://1749012385-files.gitbook.io/~/files/v0/b/gitbook-x-prod.appspot.com/o/spaces%2FcTyQ05dv9UTW8n6ypeAM%2Fuploads%2FE650U68Zaocex5BGj0k6%2Fimage.png?alt=media&#x26;token=119c9b4c-1a43-4ae9-b5c5-59d1387c862e" alt="" width="563"><figcaption></figcaption></figure>

This base handler receives and processes xAPI statements from your connection.

Note that when you save it, you must call it `xAPI Actions Handler`

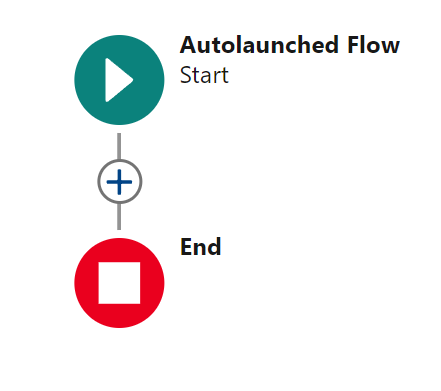
This is an **Autolaunched Flow** that will be called when an xAPI statement arrives.

<figure><img src="https://1749012385-files.gitbook.io/~/files/v0/b/gitbook-x-prod.appspot.com/o/spaces%2FcTyQ05dv9UTW8n6ypeAM%2Fuploads%2Frerhr4Qn66quPOQJHHZw%2Fimage.png?alt=media&#x26;token=85e5ec34-632a-4986-b865-d4407859a463" alt="" width="221"><figcaption></figcaption></figure>

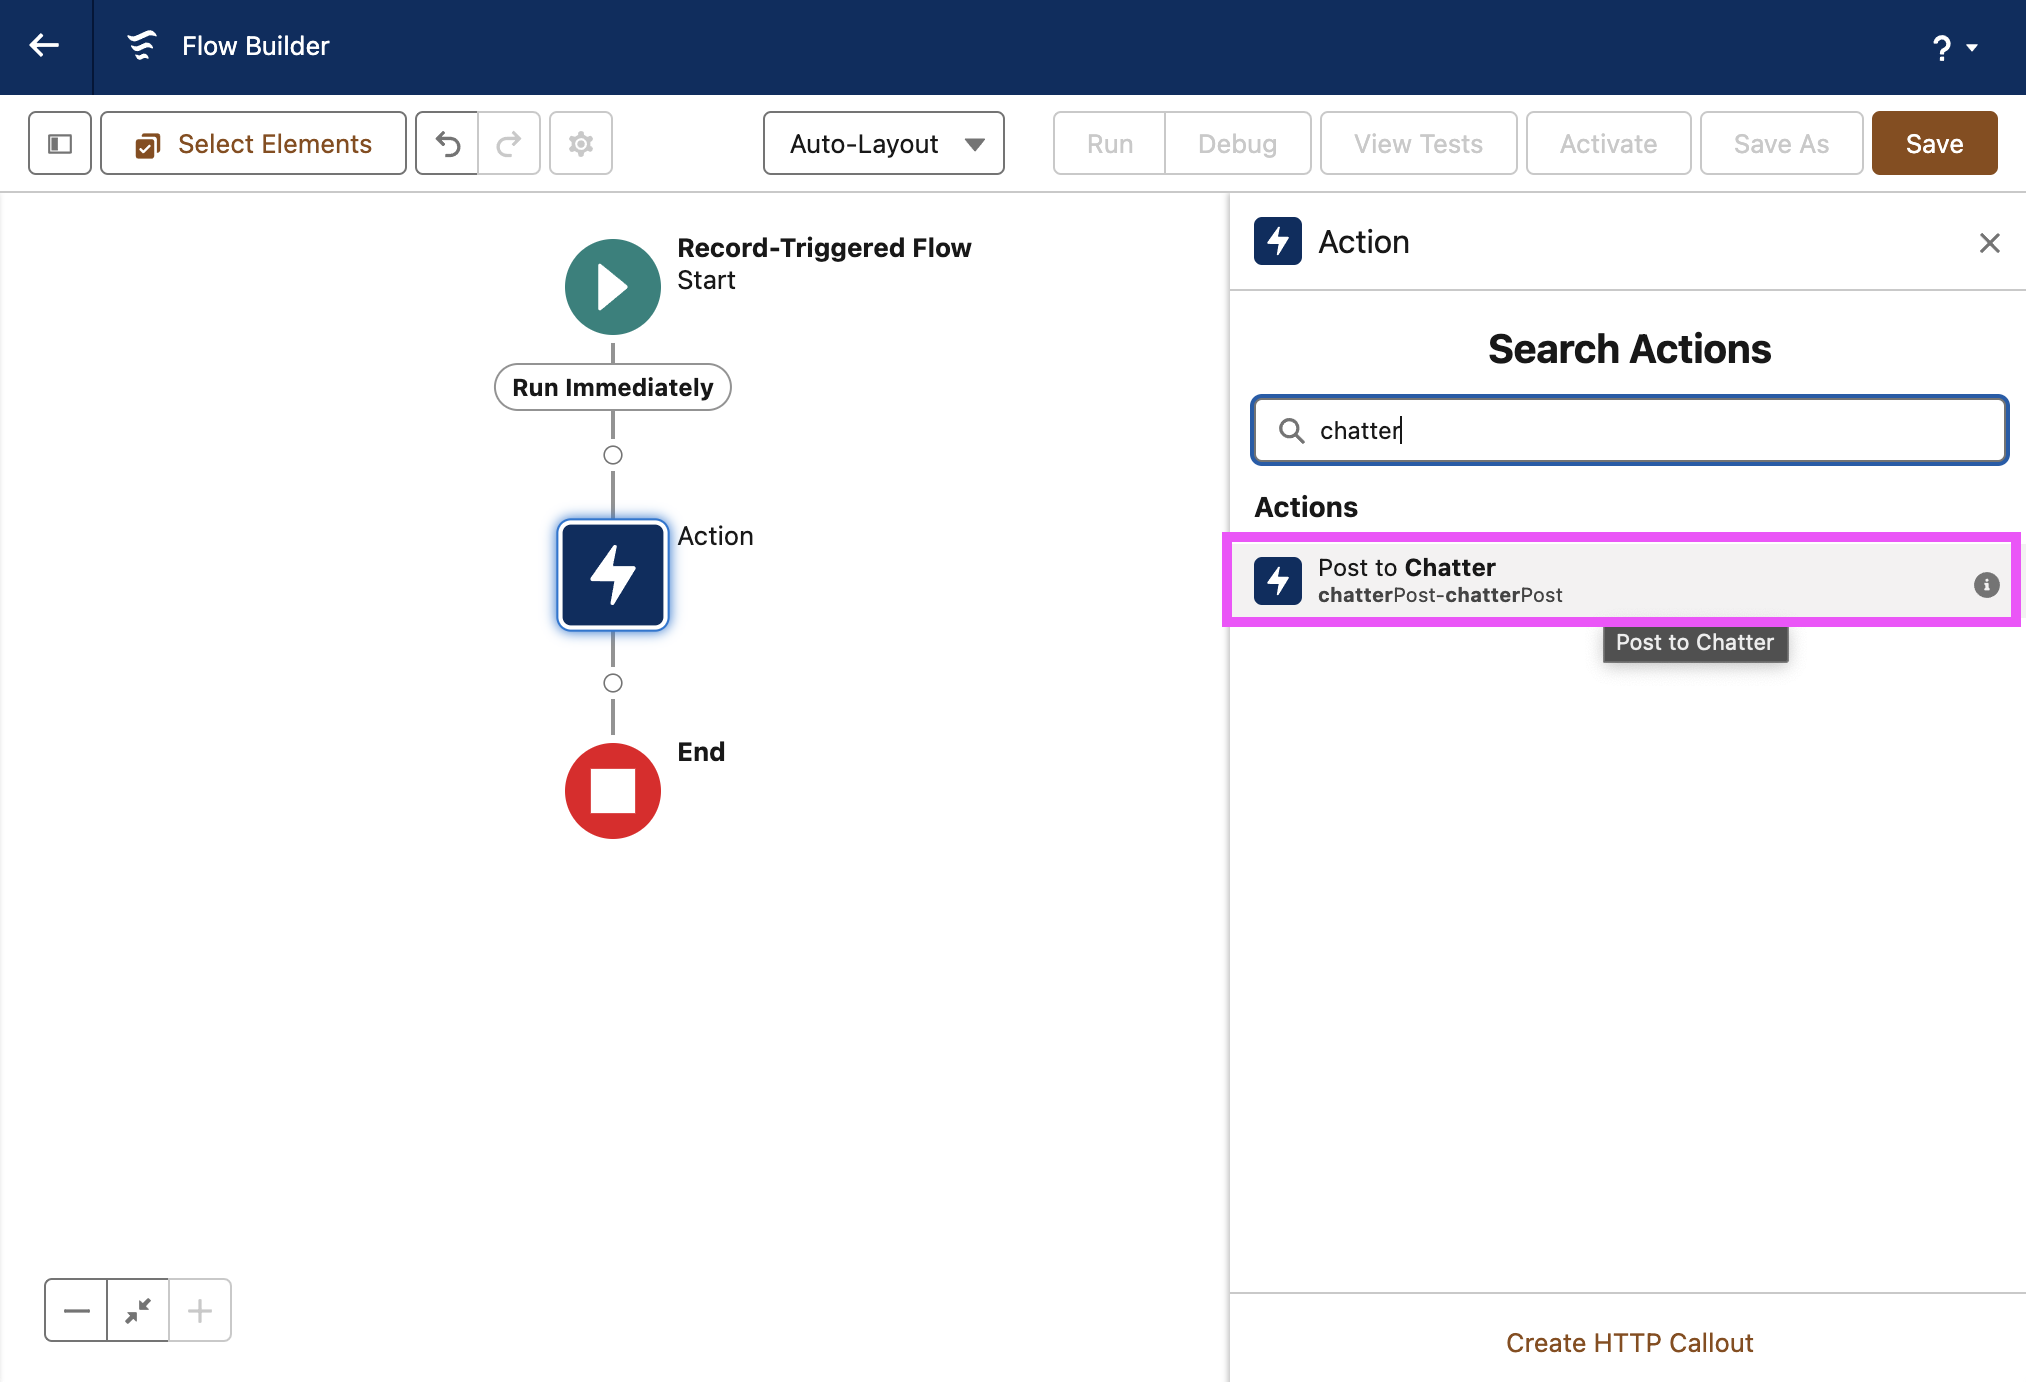
Select the plus sign to add an **Action** and select the **Chatter** post action:

<figure><img src="https://1749012385-files.gitbook.io/~/files/v0/b/gitbook-x-prod.appspot.com/o/spaces%2FcTyQ05dv9UTW8n6ypeAM%2Fuploads%2FwY8sEtYTHCLZxZW8n6ap%2FScreenshot%202024-08-29%20at%2013.56.34.png?alt=media&#x26;token=a8749c31-755e-4381-a4e2-29874cf7aff1" alt="" width="563"><figcaption></figcaption></figure>

### Configure Chatter

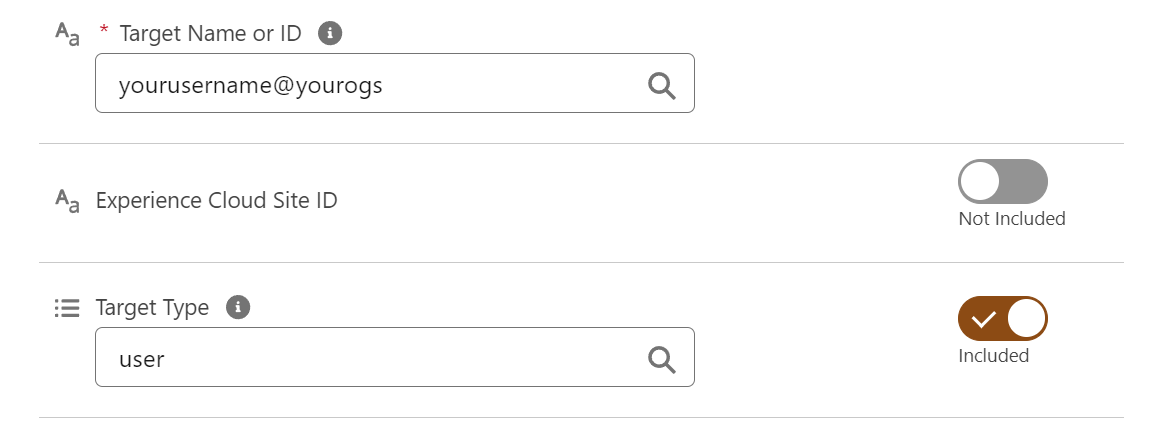
If you have not used Chatter before, the quickest way to post is to post to yourself. You do this by entering in your username, which you can get from your settings page, then enabling **Target Type** and entering the text `user` in the field:

<figure><img src="https://1749012385-files.gitbook.io/~/files/v0/b/gitbook-x-prod.appspot.com/o/spaces%2FcTyQ05dv9UTW8n6ypeAM%2Fuploads%2F87jeU2uo6MU2rzZ12KbK%2Fimage.png?alt=media&#x26;token=88249fef-3d06-42c5-9c42-ad0b68d4ba1a" alt="" width="563"><figcaption><p>Enter Target Type: "User"</p></figcaption></figure>

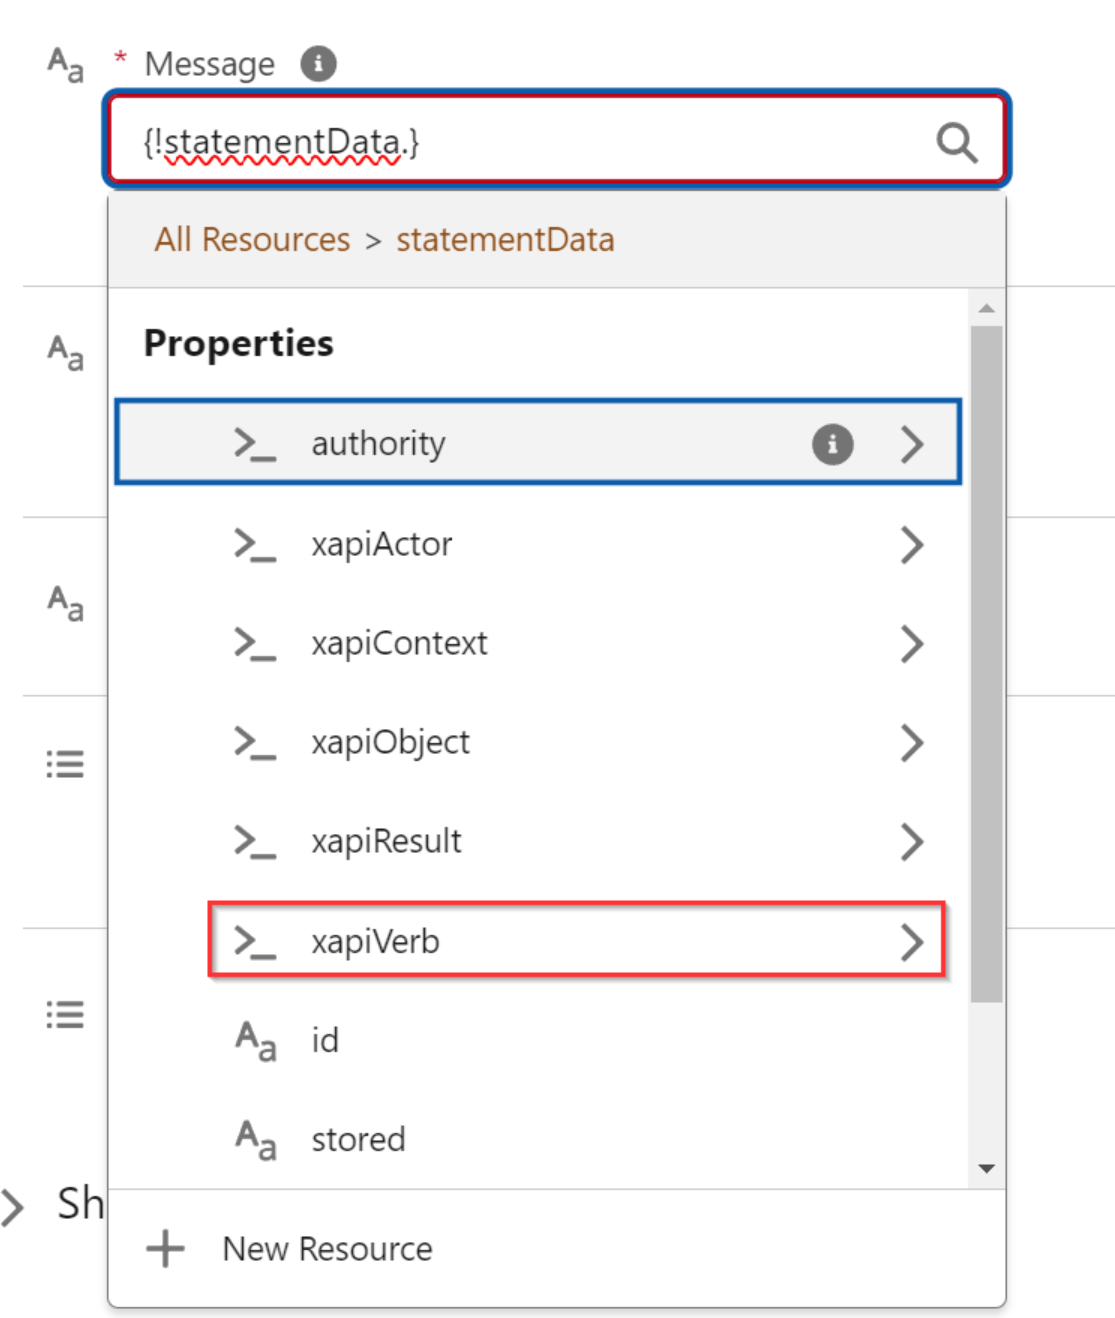
### Use the Statement Data explorer

Now you need to decide what to post. You want to post only the **Verb Id** of inbound statements for this simple demonstration.&#x20;

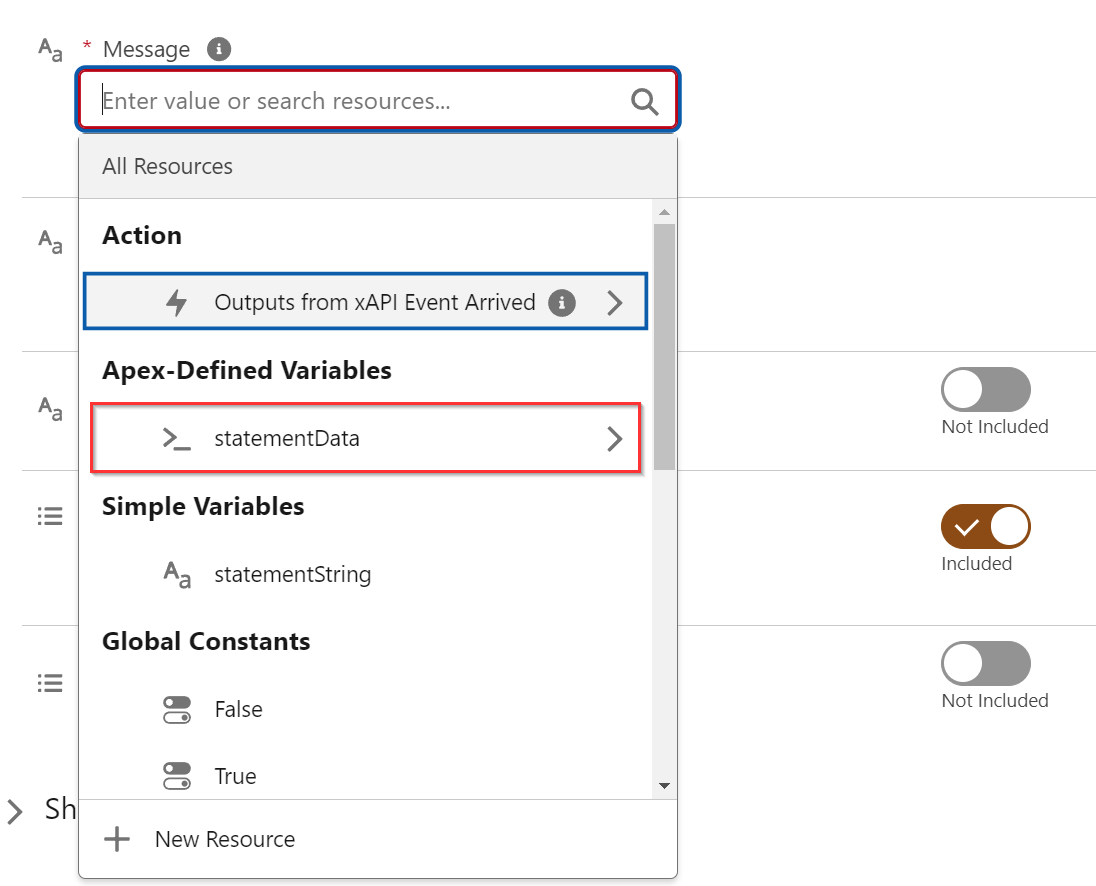
Select the **Message** field so that the **Resources** drop down selector appears.  It is here that you will find the **xAPI statement data:**

<figure><img src="https://1749012385-files.gitbook.io/~/files/v0/b/gitbook-x-prod.appspot.com/o/spaces%2FcTyQ05dv9UTW8n6ypeAM%2Fuploads%2FtalALwpbGYy8gULSiy3E%2Fimage.png?alt=media&#x26;token=d43d8a83-b1a2-4848-ba2a-bf537fb725b9" alt="" width="563"><figcaption></figcaption></figure>

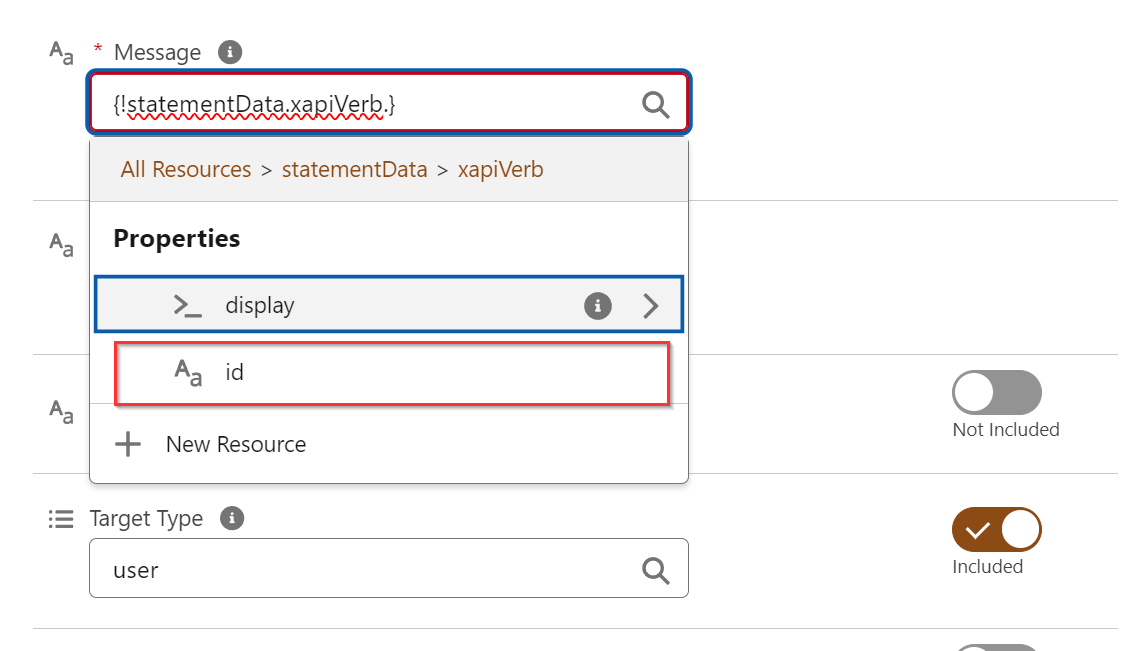
Select **statementData** then select **xapiVerb**

<figure><img src="https://1749012385-files.gitbook.io/~/files/v0/b/gitbook-x-prod.appspot.com/o/spaces%2FcTyQ05dv9UTW8n6ypeAM%2Fuploads%2FxKQ48ZVOQiHnxhjQIfuY%2Fimage.png?alt=media&#x26;token=030f15b8-8c0b-48fb-8625-c0cdbfd234d1" alt="" width="375"><figcaption></figcaption></figure>

Then select **id**

<figure><img src="https://1749012385-files.gitbook.io/~/files/v0/b/gitbook-x-prod.appspot.com/o/spaces%2FcTyQ05dv9UTW8n6ypeAM%2Fuploads%2FwQMdxdIjLWYYIGhubMRc%2Fimage.png?alt=media&#x26;token=d7c8c142-9b9a-4757-8ee2-a527d558fe2b" alt="" width="563"><figcaption></figcaption></figure>

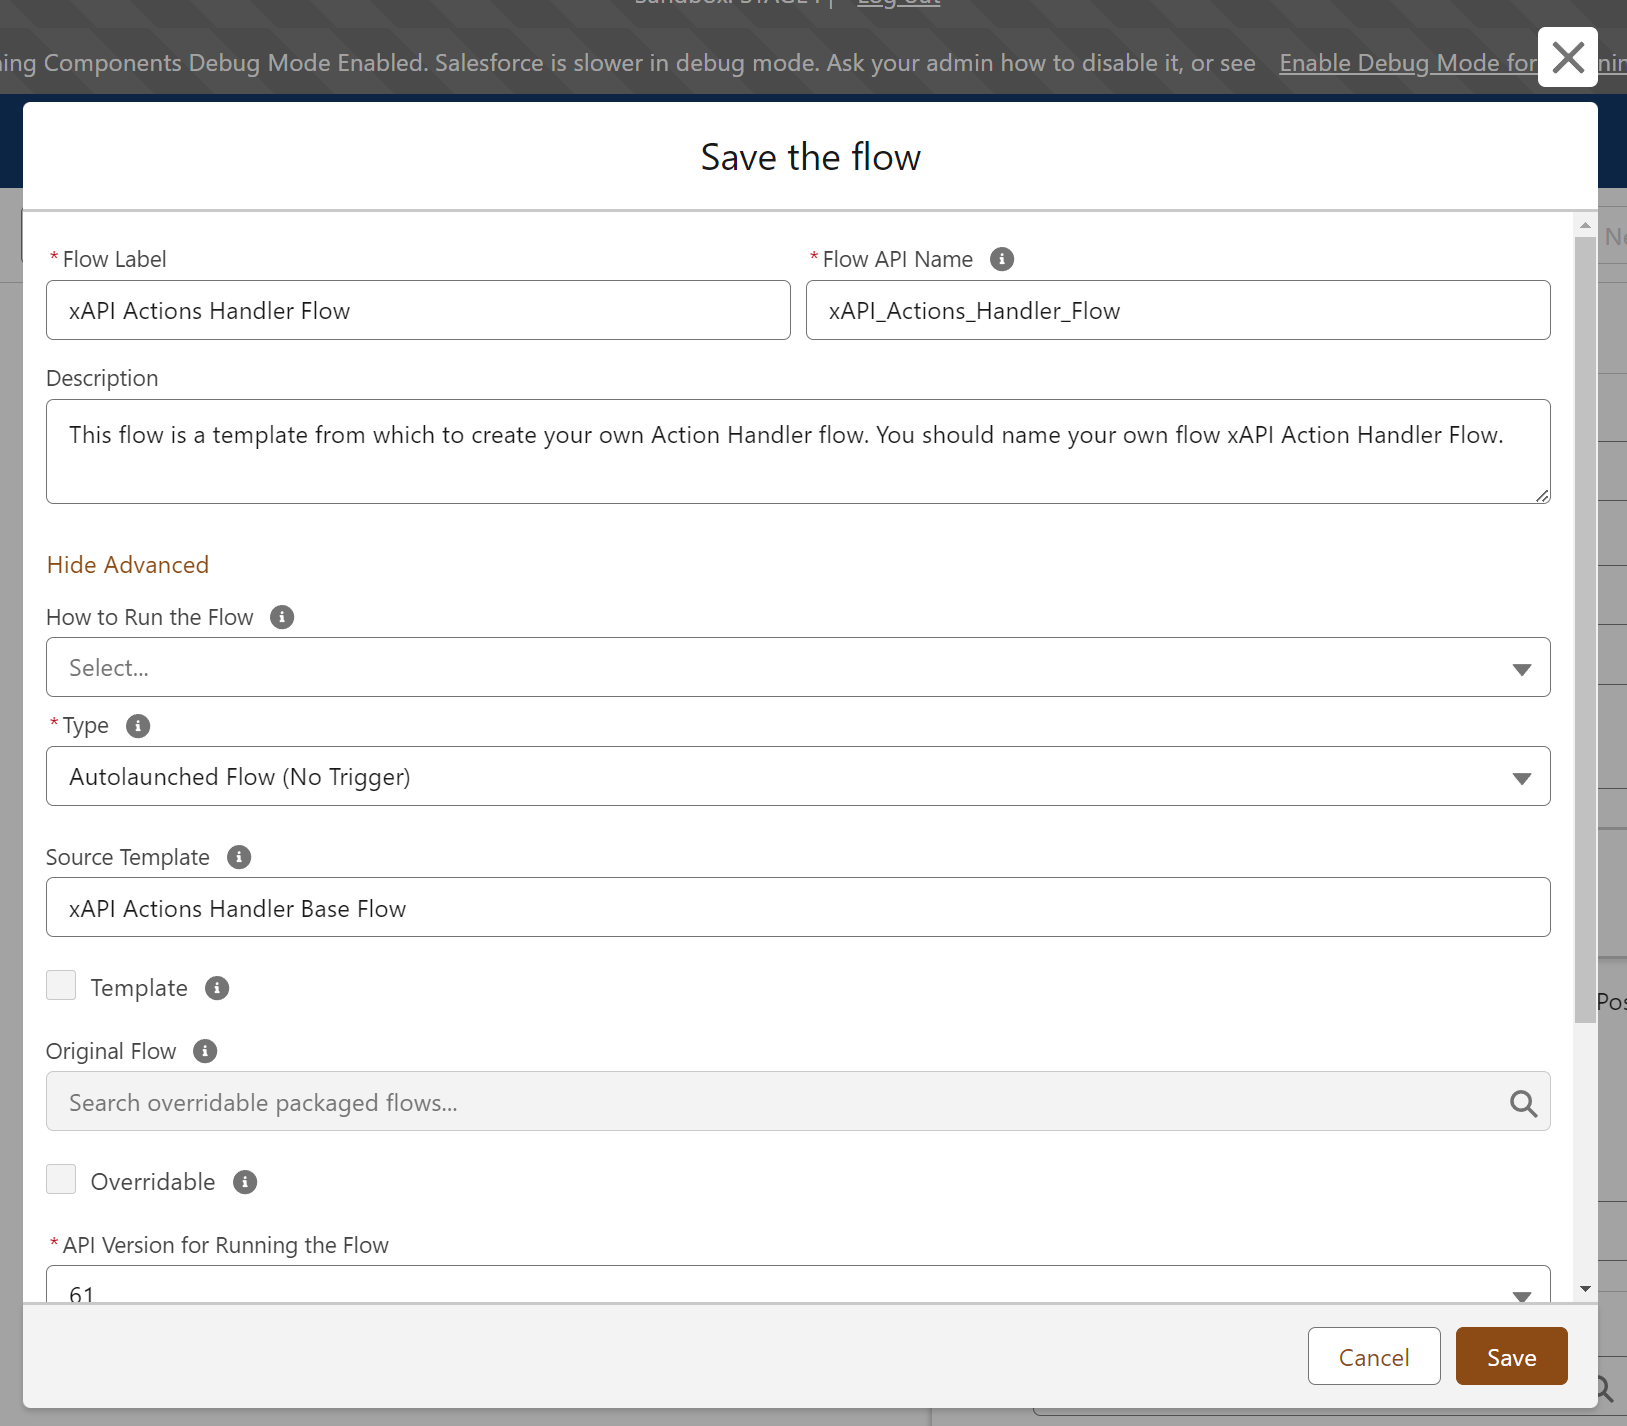
### Save flow with correct name

Finally you need to save and enable your flow.

When you save the flow, you must call it `xAPI Actions Handler Flow` otherwise it will not be triggered. By default it will want to save it as "xAPI Actions Handler Base Flow" because it has come from the template. You should also select the **Source Template** as "xAPI Actions Handler Base Flow" as Salesforce will not do this automatically:

<figure><img src="https://1749012385-files.gitbook.io/~/files/v0/b/gitbook-x-prod.appspot.com/o/spaces%2FcTyQ05dv9UTW8n6ypeAM%2Fuploads%2FIxZf5uVjPdby0ONgvII3%2Fimage.png?alt=media&#x26;token=7951ffad-7634-4ad8-b187-5e4758e75c1e" alt="" width="375"><figcaption></figcaption></figure>

Once you have saved the flow, **Activate** it by selecting the button in the top menu.

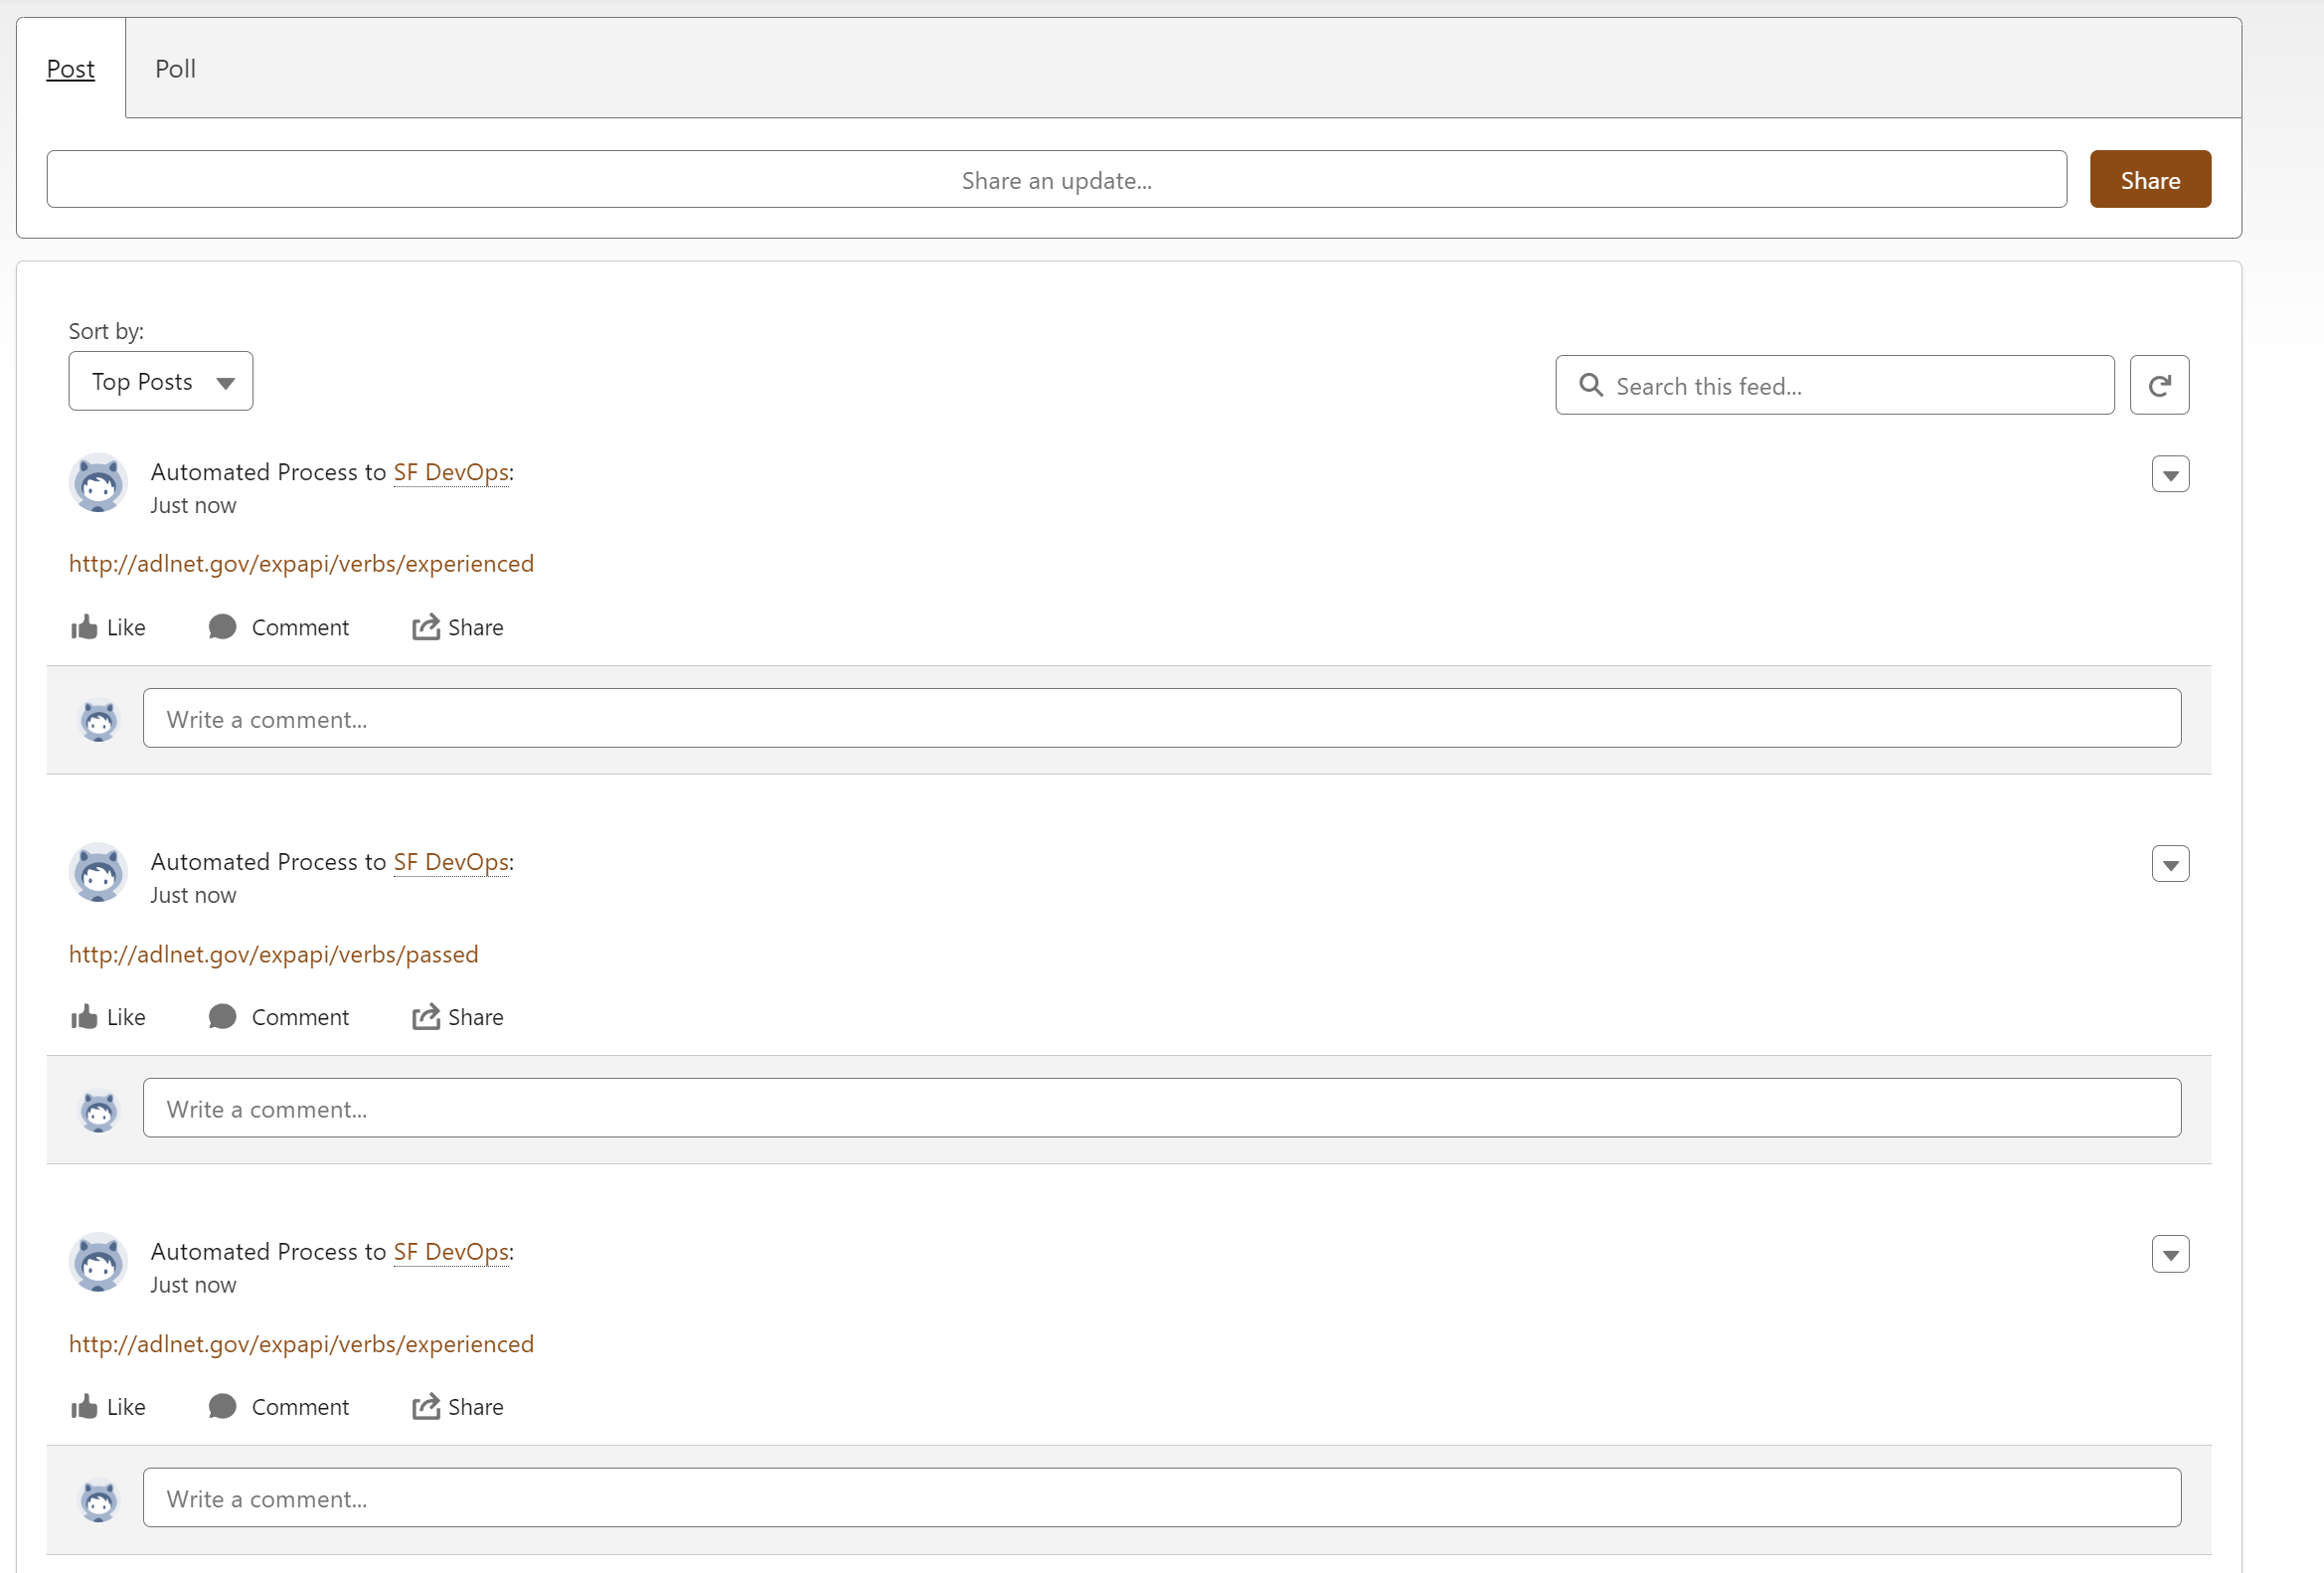
### View experience Verb Ids in Chatter

If you have had your LRS connected all this time (if not, [do that now](https://documentation.globebyte.com/reasoning-ai/actions-for-learning/setting-up-xapi-actions)), switch over to Chatter to see the Experience verb id posts in your Chatter posts view:

<figure><img src="https://1749012385-files.gitbook.io/~/files/v0/b/gitbook-x-prod.appspot.com/o/spaces%2FcTyQ05dv9UTW8n6ypeAM%2Fuploads%2F7dALfXC7had3ctsObQaU%2Fimage.png?alt=media&#x26;token=36ee0a9b-1099-4277-801b-9cf363f1744c" alt="" width="563"><figcaption></figcaption></figure>

You have completed your first test flow.&#x20;
