# Setting up Tutor
Welcome to the **Tutor for Learning** documentation! built for **Agentforce,** Tutor is a powerful extension to our [**Assess for Learning**](https://documentation.globebyte.com/reasoning-ai/assess-for-learning) agent, designed to enhance the assessment experience by providing the learner with an AI interface into their assessment data.
By combining **personalized learning** with **intelligent feedback,** **Tutor for Learning** fosters deeper engagement and more effective outcomes for every learner.
You’ll find everything you need here to setup and manage **Tutor.**
The Tutor for Learning v1.0.0 package consists of five Invocable Apex Classes. These Apex Classes are intended to be set up as Agent Actions and assigned to Topics in Agentforce. The below steps provide complete setup instructions for these Agent Actions, as well as setup details for two Topics to assign the Agent Actions to.
### 1. Prerequisites
1. Ensure you are running an Org with the '**Einstein1AIPlatform**' license installed. This license is required in order to run Agentforce in the Org.
2. Ensure the [**Learning Journey Data Model**](https://documentation.globebyte.com/reasoning-ai/learning-journey-model) (LDM), [**Assess for Learning**](https://documentation.globebyte.com/reasoning-ai/assess-for-learning), and [**Tutor for Learning**](https://documentation.globebyte.com/reasoning-ai/tutor-for-learning) packages are installed in your Org.
3. Enable ‘**Einstein Copilot for Salesforce**’ in your Org:
4. Enable ‘**Einstein Bots**’ in your Org:
### 2. Setup Agent Actions
The Tutor for Learning package consists of the following Invocable Apex Classes:
* **Tutor\_Mark**
* Description: Retrieves the overall learner mark, feedback, and instructional feedback types for a given assessment.
* **Tutor\_Task**
* Description: Retrieves the individual learner task scores, feedback, and instructional feedback types for a given assessment.
* **Tutor\_Criterion**
* Description: Retrieves the individual learner criterion scores, feedback, and instructional feedback types for a given task in an assessment.
* **Tutor\_SenseMaking**
* Description: Queries the generated AI model for specific course knowledge covered by an assessment.
* **Tutor\_Instruction**
* Description: Queries the generated AI model for instructional guidance on knowledge covered by an assessment.
Each Invocable Apex Class must be manually added and configured as an Agent Action. The configuration details for each Agent Action can be found in this folder: [Agent Actions](https://documentation.globebyte.com/reasoning-ai/tutor-for-learning/agent-actions)
The below steps will refer to specific sections in these configuration detail pages. For each Invocable Apex Class, follow the below steps to setup the Agent Action for Agentforce:
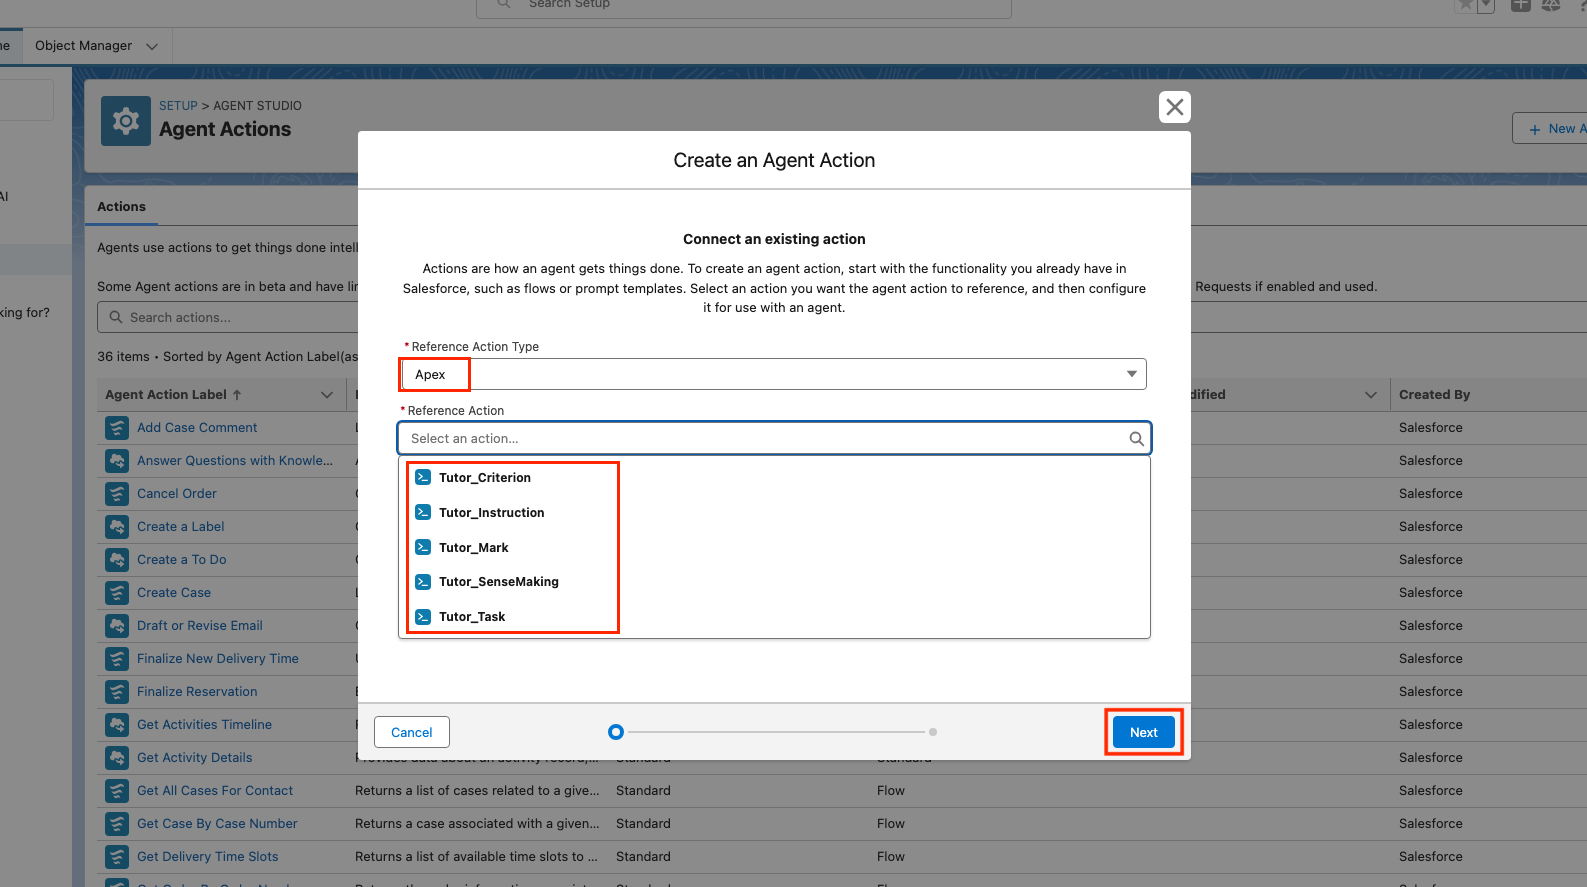
1. **Select ‘Agent Actions’ inside ‘Setup’ and press ‘New Agent Action’:**
2. **Select ‘Apex’ as the Reference Action Type and select one of the Tutor for Learning Apex Classes from the list, then press ‘Next:**
3. **Use the configuration details document for the given** [**Agent Action**](https://documentation.globebyte.com/reasoning-ai/tutor-for-learning/agent-actions) **to fill out all configuration sections exactly:**
Checks for filling out configuration details:
* Ensure the correct configuration details document is used from the folder: [Agent Actions](https://documentation.globebyte.com/reasoning-ai/tutor-for-learning/agent-actions)
* Ensure all of the following sections are filled out correctly:
* **Agent Action Instructions**
* **Inputs:**
* Instructions
* Advanced Settings
* **Outputs:**
* Instructions
* Advanced Settings
* Capture all formatting as provided in the configuration details document including bullet points.
* Once all configuration details are complete, press ‘**Finish**’.
**Repeat steps 1-3 for all five Apex Classes. Once complete you should have five new Agent Actions.**
### 3. Setup Topics
There are two Topics that are recommended for configuration to effectively utilise Tutor for Learning. These Topics are as follows:
* **Tutor\_Assessment**
* Description: Provides the Agentforce Agent with the ability to discuss and educate a student on their graded performance against a particular assessment.
* **Tutor\_Knowledge**
* Description: Provides the Agentforce Agent with the ability to converse with a student on specific course material covered by an assessment.
Each Topic must be manually added and configured inside Agentforce. The configuration details for each Topic can be found in this folder: [Topics](https://documentation.globebyte.com/reasoning-ai/tutor-for-learning/topics)
The below steps will refer to specific sections in these configuration detail pages. It is currently recommended to use the ‘**Einstein Copilot**’ Agent when configuring Topics and applying Agent Actions. Follow the below steps to setup each Topic:
1. **Select ‘Agents’ inside ‘Setup’. On the ‘Einstein Copilot’ Agent press the down arrow and then press ‘Open in Builder’:**
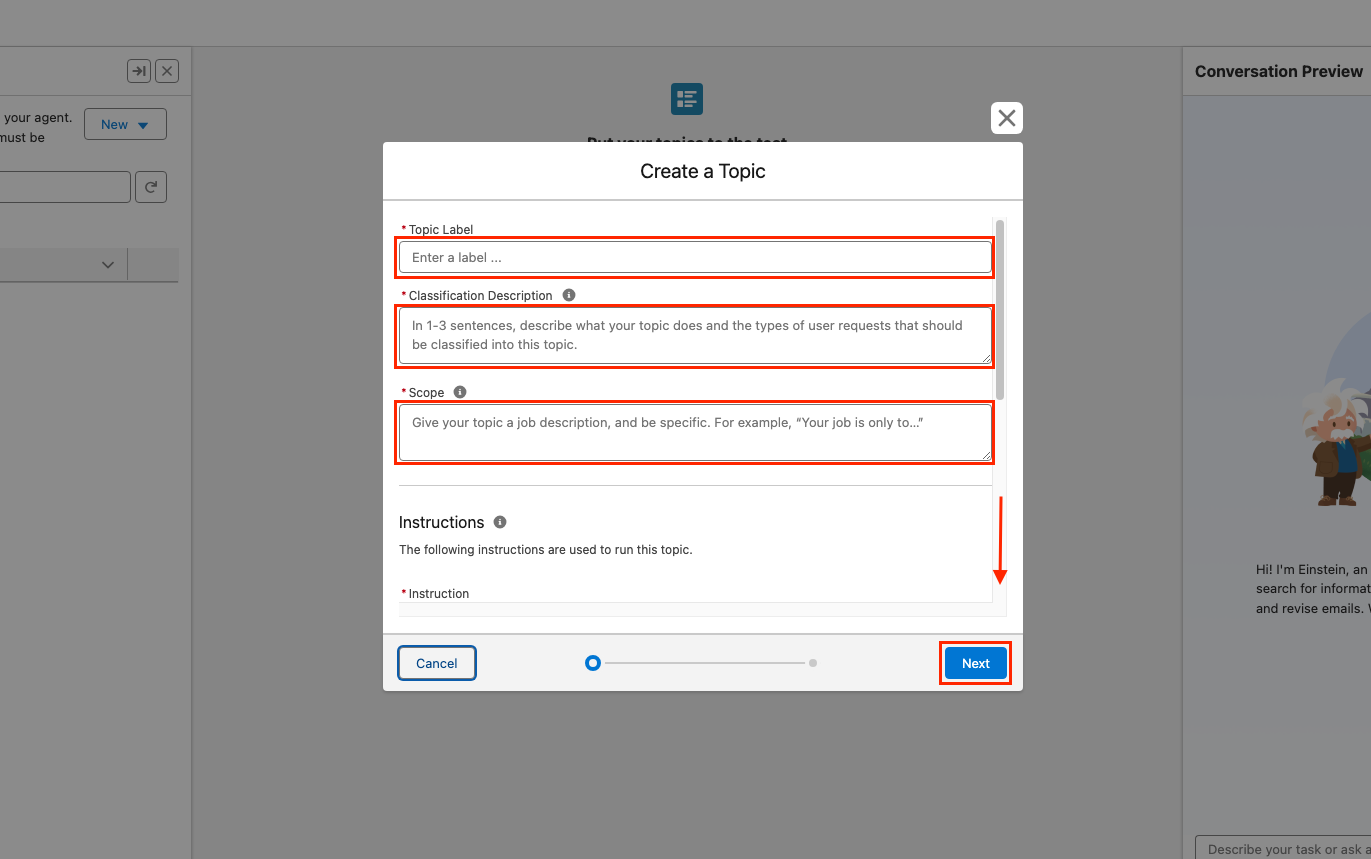
2. **Select the ‘Topics’ tab from the side bar. Ensure to remove all default Topics from the Einstein Copliot Agent first, then press ‘New’ and ‘New Topic’:**
3. **Use the configuration details document for the given** [**Topic**](https://documentation.globebyte.com/reasoning-ai/tutor-for-learning/topics) **to fill out all configuration sections exactly:**
Checks for filling out configuration details:
* Ensure the correct configuration details document is used from the folder: [Topics](https://documentation.globebyte.com/reasoning-ai/tutor-for-learning/topics)
* Ensure all of the following sections are filled out correctly:
* **Topic Label**
* **Classification Description**
* **Scope**
* **Instructions**
* **Example User Input**
* Capture all formatting as provided in the configuration details document including bullet points. The numbered breaks in the configuration details document, e.g. ‘1---’, indicate a new instruction or example user input to be added.
* Once all configuration details are complete, press ‘**Next**’.
4. **Search for ‘Tutor’ in the search bar, then select all the Agent Actions to apply to the Topic as stated in the configuration details document, then press ‘Finish’:**
**Repeat steps 2-4 for both Topics. Once complete you should have two Topics with the correct Agent Actions applied to them.**
### 4. Setup Validation
After completing all setup steps, press ‘**Activate**’ on your Agent inside of Agent Builder:
Tutor for Learning requires a graded submission output from [Assess for Learning](https://documentation.globebyte.com/reasoning-ai/assess-for-learning) in order to be used effectively. Please follow the [Assess for Learning](https://documentation.globebyte.com/reasoning-ai/assess-for-learning) guide in order to return a graded submission output for a learner into the [Learning Journey Data Model](https://documentation.globebyte.com/reasoning-ai/learning-journey-model).
\
Once a graded output is present in the [Learning Journey Data Model](https://documentation.globebyte.com/reasoning-ai/learning-journey-model), **Tutor for Learning** can be engaged against the submission. To validate the Agent, inside Agent Builder execute the following queries in order after each response from the Agent, make sure to replace the assessment name and contact email with your values:
1. Start the chat with: ‘Please tell me my assessment grades’.\
Then proceed in order with each subsequent query:
2. ‘The assessment name is \.’
3. ‘My email is \.’
4. ‘Can I see my overall instructional feedback?’.
5. ‘Can I see how to improve my overall score by one grade?’.
6. ‘Can I see my score for Question 1 only?’
7. ‘Can I see this score against the rubric?’
8. ‘That is everything I need, thank you’.
{% hint style="warning" %}
**Need help?** If you need further assistance or encounter any difficulties, our support team is ready to help. Please reach out to us at
{% endhint %}